
SwiftUIでは2系からSceneDelegateが使用されなくなりました。
しかし自分で追加することでSceneDelegateの使用は可能です。
調べるとおおよそ2パターン見受けられるのでまとめておきます。
共通部分
AppとSceneDelegateは共通です。
AppDelegateとInfo.plistの有無が異なります。
import SwiftUI

@main
struct TestApp: App {

    @UIApplicationDelegateAdaptor(MyAppDelegate.self) var appDelegate

    var body: some Scene {
        WindowGroup {
            ContentView()
        }
    }
}


class MySceneDelegate: UIResponder, UIWindowSceneDelegate {
    func scene(_ scene: UIScene, willConnectTo session: UISceneSession, options connectionOptions: UIScene.ConnectionOptions) {
    }

    func sceneDidDisconnect(_ scene: UIScene) {
    }
}
UIApplicationDelegateAdaptorでAppDelegateを使用します。
MyAppDelegateはUIApplicationDelegateを継承したクラスです。
過去にデフォルトでAppDelegateで作成されていた為にAppDelegateと表記される事が多いですが、
現在では元から存在するものではなく自分でつけたクラス名と一致する様にして下さい。
パターン1(Info.plistなし)
AppDelegateのみで完結します。
差分も少なく変更も楽なのでこちらをおすすめします。
import SwiftUI

class MyAppDelegate: NSObject, UIApplicationDelegate {

        func application(
            _ application: UIApplication,
            configurationForConnecting connectingSceneSession: UISceneSession,
            options: UIScene.ConnectionOptions
        ) -> UISceneConfiguration {

            let config = UISceneConfiguration(name: nil, sessionRole: connectingSceneSession.role)
            config.delegateClass = MySceneDelegate.self
            return config
        }
}
UISceneConfigurationのnameがnilとなっています。
またdelegateClassにSceneDelegateを指定しています。
以上でSceneDelegateが使用可能になります。
パターン2(Info.plistあり)
Info.plistに追記を行い、AppDelegateからはInfo.plist経由で参照する様に指定します。
import SwiftUI

class MyAppDelegate: NSObject, UIApplicationDelegate {

        func application(
            _ application: UIApplication,
            configurationForConnecting connectingSceneSession: UISceneSession,
            options: UIScene.ConnectionOptions
        ) -> UISceneConfiguration {

            UISceneConfiguration(name: "My Configuration", sessionRole: connectingSceneSession.role)
        }
}
<?xml version="1.0" encoding="UTF-8"?>
<!DOCTYPE plist PUBLIC "-//Apple//DTD PLIST 1.0//EN" "http://www.apple.com/DTDs/PropertyList-1.0.dtd">
<plist version="1.0">
<dict>
<key>UIApplicationSceneManifest</key>
<dict>
<key>UIApplicationSupportsMultipleScenes</key>
<true/>
<key>UISceneConfigurations</key>
<dict>
<key>UIWindowSceneSessionRoleApplication</key>
<array>
<dict>
<!-- <key>UISceneClassName</key>-->
<!-- <string></string>-->
<key>UISceneConfigurationName</key>
<string>My Configuration</string>
<key>UISceneDelegateClassName</key>
<string>$(PRODUCT_MODULE_NAME).MySceneDelegate</string>
<!-- <key>UISceneStoryboardFile</key>-->
<!-- <string></string>-->
</dict>
</array>
</dict>
</dict>
</dict>
</plist>UISceneConfigurationのnameを設定しました。
そしてInfo.plist側にUISceneConfigurationNameとUISceneDelegateClassName設定します。
今回は自分で設定したものであることを分かりやすくする為に、
あえて値を「My Configuration」と「MySceneDelegate」としています。
よく使われるのは「Default Configuration」と「SceneDelegate」になります。
これはXcodeで自動生成される時にこの値だったからです。
UISceneClassNameとUISceneStoryboardFileは不要ですので、
Propaty Listから編集して自動生成されていた場合は消すかコメントアウトして下さい。
Propaty List表示で見ると以下の様になります。
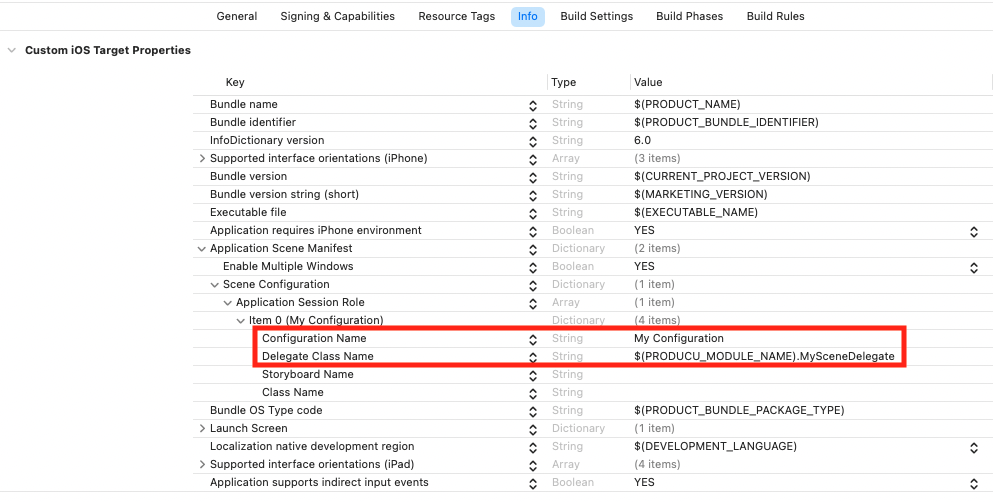
なお、現在のXcodeではInfo.plistファイルはデフォルトで表示されません。
プロジェクト設定のInfoタブから見る事が出来ます。
また、ここから編集を行うとファイル一覧に表示される様になります。
XML形式で編集したい場合はファイル一覧から右クリックしてOpen As > Source Codeで開きます。
SwiftUIライフサイクルに関して
SwiftUIライフサイクルが崩れるとScene StoregeやScene Phaseが使えなくなる他、様々な影響が出る可能性があります。
今回Scene Delegateを使用しましたが、sceneメソッドの中身には手をつけていません。
このままであればSwiftUIライフサイクルのまま使用する事が出来ます。
sceneでWindowやRootViewControllerに変更を加えるとSwiftUIライフサイクルが崩れる可能性があるので気をつけて下さい。
SceneDelegateの必要性
SceneDelegateが必要な場合はあります。
具体的にはSceneの終了に応じて処理を行う場合です。
SwiftUIでSceneの変化に応じて処理を行うにはScenePhaseを使います。
active、inactive、backgroundの3種類しかありませんが、おおよその場合は対応できます。
しかしSceneの終了に関しては検知する事が出来ないのでSceneDelegateが必要になります。

コメント
[…] […]